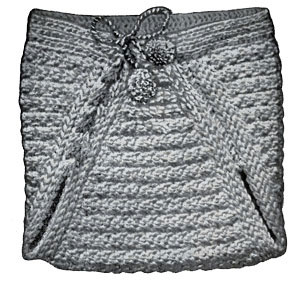
Crocheted Soakers .
This free pattern originally published in: Quick Chochet.


These Soakers, to be crocheted, are used like rubber pants— slipped on over the diapers. Made of Enterprise Cotton, they may be boiled to sterilize as required by modern practice. They may be made accurately to size needed—see Row 4 for instructions on how to fit.
MATERIALS: 2 balls White (3 balls will make 2 Soakers)— 10 yards color. Steel Crochet Hook No. 1.
SIZE: 7½" from top to bottom, 8½" across. (16" waist measurement.)
STARTING AT WAIST: With White, ch 2, 2 sc in first st of ch.
ROW 2: Ch 1, turn, 1 sc in back loop of last sc, 1 sc in front loop of next, 1 sc in back loop of ch-1.
ROW 3: Ch 1, turn, (1 sc in back loop of last sc, 1 sc in front loop of next). Repeat to end, l sc in front loop of ch-1 (4 sc).
ROW 4 to 56 INCLUSIVE: Same as Row 3, starting first 2 rows in front loop of sc, then next 2 rows in back loop, adding 1 st each row until 56 rows are complete (57 sc in last row). For larger sizes additional rows may be added until desired size is reached. To find exact size needed, measure child from front waistline—thru crotch and up to back waistline, and work to size. The waist band on garment will add ¾" front and back (1½" added to length). Each rib (2 rows) added to length will increase waist band about ⅝" (4 sts).
LEG BAND: Ch 1, work along edge of point with 1 sl st (worked loosely) in each row (56 sl st), * ch 1, turn, 1 sl st in back loop of each sl st of previous row, repeat from * 3 times (5 rows in all). Fasten off. Join again to opposite edge of point and work 5 rows to correspond with other side. Piece now measures 15" from point to top, 14½" across top.
WAIST BAND: With right side of work up, join to first st (last row of leg border) at right corner, 1 sl st in back loop of each st across top, including leg border at end of waistline and pick up point, 1 sl st in each st across point.
ROW 2: Ch 1, turn, 1 sl st in back loop of sl st across.
ROWS 3 to 7 INCLUSIVE: Same as Row 2. Fasten off.
Sew first 15 sts of opening (below band) together; leave remaining stitches free for leg opening. If desired, this opening may be left so that it is held together by the tie to open and close when in use. Sew other side to top.
With color, ch 125 and lace to side as illustrated.
PUFF BALL: Make two—Wrap a single thread of Pink or Blue around a cardboard 1½" wide, 25 times, slip from board, tie tightly at center and cut ends evenly, fluff and fasten one to each end of ch.
Related articles
- One Piece Boy for Carolyn (amigurumibb.wordpress.com)
- Baby legs/Legwarmers Pattern (woolybearcrochet.wordpress.com)
- Broomstick Lace Hat Pattern by Margaret Hubert (as seen in Lacework for Adventurous Crocheters) (craftside.typepad.com)
- Crochet Water Bottle Holder - Free Pattern (goddesscrochet.wordpress.com)
- Commemorative Crocheted Crown (sarahlondon.wordpress.com)
- Cat Ears or Fox Ears Crochet Pattern (craftyghoul.com)
 and Bonnets!


